
How to Do the Hip Thrust Correctly
How to Do the Hip Thrust Correctly
The hip thrust is a powerful exercise for building glute strength and improving lower body performance.
To perform it correctly, set up with your upper back on a bench, brace your core, and lift your hips by driving through your heels until your body forms a straight line from shoulders to knees.
Keep reading for a detailed step-by-step guide and tips to perfect your form.
Understanding the Hip Thrust: What and Why?
The hip thrust is a fundamental exercise in strength training that specifically targets the glute muscles.
By understanding what the hip thrust is and why it’s beneficial, you can optimize your workout routine to build strength, improve performance, and reduce injury risk.
Definition of the Hip Thrust Exercise and Its Primary Muscle Targets
The hip thrust is a lower body exercise designed to strengthen and build the gluteal muscles, primarily the gluteus maximus.
This exercise involves lifting the hips upward while keeping the upper back supported on a bench, focusing on creating maximum tension in the glutes throughout the movement.
Although the primary focus is on the glutes, the hip thrust also engages the hamstrings and adductors, helping to develop a strong, balanced lower body.
During a hip thrust, the gluteus maximus is the main muscle that powers the movement, driving the hips upwards and allowing for full hip extension.
The hamstrings assist in this movement by stabilizing the thighs, while the adductors help maintain proper alignment and support hip stability.
Together, these muscles work in harmony to create a powerful exercise that not only builds glute strength but also enhances overall lower body function.
Benefits of Incorporating Hip Thrusts into a Workout Routine
Glute Strength and Development: One of the primary benefits of the hip thrust is its ability to effectively target and develop the glute muscles.
Unlike other lower body exercises that may distribute the load across multiple muscle groups, the hip thrust focuses the resistance primarily on the glutes.
This makes it particularly effective for those looking to increase the size and strength of their glutes.
Strong glutes are essential for athletic performance and everyday activities, providing power and stability during movements like running, jumping, and lifting.
Improved Performance in Other Lower Body Exercises: Incorporating hip thrusts into your workout routine can significantly improve your performance in other lower body exercises, such as squats and deadlifts.
By strengthening the glutes, hip thrusts enhance hip extension strength, which is crucial for these compound movements.
Stronger glutes can help you lift heavier weights, achieve better form, and reduce the likelihood of compensatory movements that can lead to injury.
For athletes, this translates to improved sprinting speed, jumping ability, and overall power.
Enhanced Hip Extension Strength: Hip extension, the action of straightening the hip joint, is a key movement in many athletic and everyday activities.
The hip thrust directly trains this movement by requiring full hip extension at the top of the lift.
By consistently practicing hip thrusts, you can develop a stronger and more powerful hip extension, which can enhance your ability to perform a wide range of exercises and activities.
This improvement in hip extension strength also contributes to better posture and reduces the risk of lower back pain.
Reduced Risk of Injury Compared to Other Lower Body Exercises: For individuals with back or shoulder issues, hip thrusts offer a safer alternative to traditional lower body exercises like squats and deadlifts.
Because the load is placed on the hips rather than the upper body, there is less strain on the spine and shoulders.
This makes the hip thrust an excellent choice for those looking to build lower body strength without exacerbating existing injuries.
Additionally, by strengthening the glutes and improving hip stability, hip thrusts can help prevent injuries related to muscle imbalances or weaknesses in the lower body.
Equipment Needed for a Proper Hip Thrust
To perform a hip thrust correctly and safely, having the right equipment is crucial.
The appropriate setup ensures you can execute the exercise with proper form, maximizing effectiveness while minimizing the risk of injury.
Essential Equipment for a Hip Thrust
Barbell or Dumbbell for Resistance: The primary piece of equipment for a hip thrust is a barbell, which is typically loaded with weight plates to provide resistance.
Barbells are ideal for this exercise because they allow for progressive overload, which is essential for muscle growth and strength gains.
However, if you’re new to the exercise or working out at home without access to a barbell, a dumbbell can be a suitable alternative.
Dumbbells offer a different form of resistance that can still be effective for glute activation, especially for beginners or those focusing on lighter weights.
Weight Bench to Support Upper Back: A weight bench is another essential component of the hip thrust setup.
The bench supports your upper back, allowing your hips to move freely and achieve the full range of motion required for the exercise.
The height of the bench is important; it should be high enough to allow your shoulders to rest comfortably against it but not so high that it compromises your ability to maintain proper form.
A typical weight bench or a sturdy exercise step platform can serve this purpose effectively.
Bar Pad or Towel to Protect Hips from the Barbell: To avoid discomfort and prevent bruising when performing hip thrusts, a bar pad or a rolled-up towel is necessary.
The pad or towel should be placed around the barbell where it will rest on your hips, cushioning the contact point and making the exercise more comfortable.
Many people find that using a bar pad specifically designed for hip thrusts offers the best combination of comfort and stability, as it typically provides more padding than a towel and stays in place better during the exercise.
Optional Equipment
Rubber Plates to Elevate the Barbell for Easier Setup: While not essential, rubber plates can be a helpful addition to your hip thrust setup, especially if you’re lifting heavier weights.
Rubber plates, which are larger in diameter than standard metal plates, elevate the barbell slightly off the ground.
This makes it easier to roll the barbell into position over your hips, reducing the strain on your lower back when setting up.
This is particularly useful for those who might struggle with lifting the barbell into place, such as beginners or individuals with limited mobility.
Tips for Selecting the Right Equipment and Setup for Beginners Versus Advanced Lifters
When selecting equipment for a hip thrust, it’s important to consider your fitness level and goals.
Beginners may want to start with lighter weights, such as a dumbbell or an unloaded barbell, to focus on mastering the form and building initial strength.
Using a lower bench or platform can also help beginners maintain better control and stability throughout the exercise.
A firm, stable surface that does not shift during the movement is essential to ensure safety and proper technique.
Advanced lifters, on the other hand, will benefit from a heavier barbell and possibly the use of additional equipment like rubber plates or resistance bands.
A standard weight bench is generally suitable for advanced lifters, but those looking to challenge themselves further might experiment with different heights or incline angles to target the glutes more effectively.
Additionally, investing in a quality bar pad can make a significant difference when lifting heavier weights, as it provides better cushioning and protection for the hips.
Step-by-Step Guide to Performing a Hip Thrust
Performing a hip thrust with proper technique is essential to maximizing the benefits of the exercise and preventing injury.
This step-by-step guide will walk you through each phase of the movement, ensuring that you execute the hip thrust correctly and effectively.
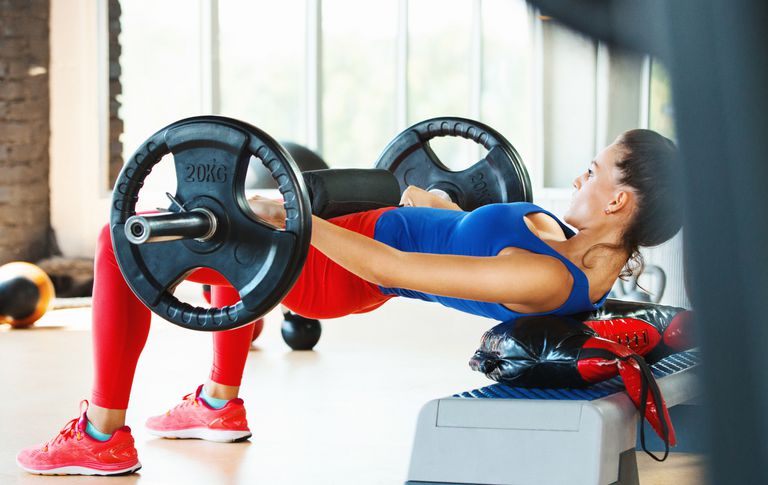
Step 1: Setup
To begin the hip thrust, start by positioning yourself and the equipment correctly.
Sit on the ground with your upper back resting against the edge of a weight bench.
The bench should be stable and set at a height that allows your shoulder blades to comfortably rest on its edge when your hips are lifted.
Position a barbell over your hips and roll it into the crease of your hips, ensuring that it sits securely.
It’s crucial to use a bar pad or a rolled-up towel on the barbell to cushion your hips and prevent discomfort or bruising during the exercise.
This padding helps distribute the pressure evenly across your hips, allowing you to focus on the movement rather than the discomfort.
Step 2: Foot Placement
Once you are positioned on the bench with the barbell over your hips, it’s time to set your feet.
Place your feet flat on the ground, roughly hip-width apart.
The exact distance may vary depending on your body mechanics, but a good rule of thumb is to ensure that your shins are vertical when you reach the top of the movement.
This positioning maximizes glute engagement and reduces the risk of shifting the load to your quads or hamstrings.
If you find that your hamstrings or quads are working more than your glutes, adjust the distance of your feet from your hips accordingly.
Moving your feet closer to your body may increase quad involvement, while moving them further away can engage the hamstrings more.
Experiment with different positions to find what feels best and most effective for targeting your glutes.
Step 3: Execution
With your body and feet in position, you are ready to perform the hip thrust.
Start by bracing your core, engaging the muscles to stabilize your torso.
This is crucial for maintaining proper form and protecting your lower back throughout the exercise.
A strong, stable core ensures that the movement is concentrated in the hips and glutes, rather than being distributed unevenly across your lower back or upper body.
To lift your hips, drive through your heels, pressing them firmly into the ground as you lift your hips toward the ceiling.
Focus on squeezing your glutes as you lift, ensuring they are the primary drivers of the movement.
Continue lifting your hips until your body forms a straight line from your shoulders to your knees.
This is known as the lockout position.
At the top of the movement, your glutes should be fully contracted, and your hips should be fully extended without overextending your lower back.
This position is key to maximizing glute activation and minimizing the risk of injury.
Once you reach the top, hold the lockout position briefly, ensuring that your glutes remain fully engaged.
Then, slowly lower your hips back to the starting position, maintaining control throughout the descent.
It’s important to avoid dropping your hips too quickly, as this can reduce the effectiveness of the exercise and increase the risk of injury.
Instead, focus on controlling the movement, keeping tension in your glutes and core as you lower your hips back to the ground.
Common Mistakes and How to Avoid Them

Proper technique is crucial when performing the hip thrust to ensure maximum effectiveness and reduce the risk of injury.
However, common mistakes can easily compromise your form and results.
By understanding these errors and learning how to avoid them, you can perform hip thrusts safely and effectively.
Recommended: Try This Best 30-Days Abs Challenge
Incorrect Foot Placement
Incorrect foot placement is a common mistake that can significantly reduce the effectiveness of the hip thrust.
If your feet are too far forward or too close to your body, the load may shift away from your glutes and onto other muscle groups, such as your hamstrings or quads.
This not only diminishes the effectiveness of the exercise for glute development but can also increase the risk of injury due to improper muscle engagement.
To ensure proper foot placement, your feet should be flat on the ground, roughly hip-width apart, and positioned so that your shins are vertical at the top of the movement.
This alignment maximizes glute activation and minimizes the involvement of other muscle groups.
If you feel your hamstrings or quads working more than your glutes, try adjusting the distance of your feet from your hips.
Moving your feet slightly closer to your body can increase quad engagement, while moving them further away can help engage the hamstrings.
Experiment with different positions to find the one that best targets your glutes.
Not Engaging the Core
Failing to engage your core during a hip thrust is another common mistake that can compromise both the effectiveness of the exercise and your safety.
A loose core can lead to a lack of stability, increasing the risk of lower back strain or injury.
When the core is not engaged, the lower back may arch excessively, placing undue stress on the spine and detracting from the primary goal of glute activation.
To properly engage your core, think about tightening your abdominal muscles as if you are bracing for a punch.
This tension helps stabilize your torso, keeping your spine in a neutral position throughout the movement.
Engaging your core not only protects your lower back but also ensures that the power generated during the hip thrust comes primarily from your glutes, making the exercise more effective.
Practice engaging your core before lifting your hips, and maintain this tension throughout the entire movement to improve your form and prevent injury.
Overextending the Lower Back
Overextending the lower back, or arching it excessively at the top of the hip thrust, is a mistake that can lead to significant discomfort or even injury.
This error often occurs when individuals try to lift their hips too high, focusing more on the height of the lift rather than proper form and muscle engagement.
When the lower back is overextended, it shifts the focus away from the glutes and places unnecessary stress on the spine, increasing the risk of lower back pain or injury.
To avoid overextending your lower back, concentrate on maintaining a straight line from your shoulders to your knees at the top of the movement.
Your hips should be fully extended, and your glutes should be maximally contracted, but your lower back should remain neutral.
Avoid the temptation to lift your hips higher than necessary, as this can cause your lower back to arch.
Instead, focus on squeezing your glutes and keeping your core engaged to achieve the correct lockout position.
Practicing this controlled movement with a lighter weight can help you master the form before progressing to heavier loads.
8 Best Science-Backed Ways to Boost Your Metabolism
Variations of the Hip Thrust
Exploring different variations of the hip thrust can help you tailor your workout to your fitness level, target specific muscle groups more effectively, and keep your routine varied and challenging.
Here are some popular variations that offer unique benefits, from building foundational strength to addressing muscular imbalances and increasing exercise intensity.
Glute Bridge
The glute bridge is a beginner-friendly variation of the hip thrust that is performed on the floor rather than with the upper back elevated on a bench.
To perform a glute bridge, lie flat on your back with your knees bent and your feet flat on the floor, positioned about hip-width apart.
From this position, engage your core and press through your heels to lift your hips off the ground, squeezing your glutes at the top of the movement.
Hold briefly, then slowly lower your hips back to the starting position.
This variation is particularly beneficial for beginners because it requires less stability and strength than the traditional hip thrust, making it easier to learn and perform correctly.
The glute bridge focuses on activating the glutes and can help you build the foundational strength needed to progress to more challenging variations.
Additionally, because it is performed on the floor, the glute bridge places less strain on the lower back and is a good option for individuals with back issues or those who are recovering from injury.
Best Booty-Building Workout Plan for Glute Gains
Single-Leg Hip Thrust
The single-leg hip thrust is a more advanced variation that increases the difficulty of the exercise by isolating one leg at a time.
This variation is performed similarly to the traditional hip thrust, but with one leg lifted off the ground.
To perform a single-leg hip thrust, set up as you would for a standard hip thrust with your upper back against a bench and a barbell or dumbbell over your hips.
Once in position, lift one foot off the ground and extend it straight out in front of you.
From this position, drive through the heel of the grounded foot to lift your hips toward the ceiling, squeezing your glutes at the top of the movement.
Lower your hips back down slowly and repeat on the same leg before switching to the other side.
This variation not only increases the challenge of the exercise by requiring greater strength and stability from the working leg but also helps address muscular imbalances.
By working each leg individually, you can ensure that both sides of your body are equally strong and developed, reducing the risk of injury and improving overall athletic performance.
The single-leg hip thrust is particularly useful for athletes or individuals who have noticed one side of their body is weaker or less developed than the other.
How Posture Affects Your Overall Health
Banded Hip Thrust
Adding a resistance band to the hip thrust is another effective way to increase the challenge and enhance glute engagement.
To perform a banded hip thrust, place a resistance band around your thighs, just above your knees, and set up as you would for a traditional hip thrust with your upper back on a bench and a barbell over your hips.
As you lift your hips toward the ceiling, the resistance band will create additional tension, forcing your glutes to work harder to push against the resistance and maintain proper form.
The banded hip thrust is an excellent variation for those looking to increase the intensity of their workout without adding more weight to the barbell.
The resistance band not only increases the workload on the glutes but also engages the hip abductors, which are responsible for moving the thighs away from the midline of the body.
This added challenge helps to strengthen the entire glute complex and can lead to greater overall muscle activation and growth.
Additionally, the banded hip thrust is a great option for individuals who may not have access to heavier weights but still want to progress their training and continue building strength.
Programming Hip Thrusts into Your Routine
Incorporating hip thrusts into your workout routine can greatly enhance glute strength, lower body power, and overall athletic performance.
However, it’s important to understand how to properly program them based on your fitness goals, whether you are a beginner or an advanced lifter.
Summary
Hip thrusts are a versatile exercise that can significantly enhance glute strength, muscle growth, and overall lower body performance.
By focusing on proper form, understanding the different variations, and effectively programming them into your routine, you can maximize their benefits.
Incorporate these techniques into your workouts to achieve stronger, more powerful glutes and improved fitness outcomes.
https://t.me/s/Online_1_xbet/1449
https://t.me/s/Online_1_xbet/940
https://t.me/s/Online_1_xbet/1797
sykaaa регистрация
риобет зеркало
сукааа регистрация
riobet casino
房中秘术、泡妞把妹、丰胸美体、奇淫巧技!价值十万电子书下载网址:https://www.1199.pw/
https://t.me/s/Online_1_xbet/3490
https://t.me/s/Online_1_xbet/2405
https://t.me/s/Online_1_xbet/3429
https://t.me/s/Official_1xbet_1xbet
jvspin зеркало
unlim casino рабочее зеркало
https://t.me/s/rating_online/7
https://t.me/rating_online/9
https://t.me/s/rating_online
https://t.me/s/rating_online/8
https://t.me/rating_online/5
https://t.me/rating_online/13
https://t.me/rating_online/8
https://t.me/s/rating_online/3
https://t.me/rating_online/1
https://t.me/s/rating_online/6
https://t.me/s/rating_online/1
https://t.me/rating_online
1xslots зеркало
sykaaa регистрация
https://t.me/rating_online/7
https://t.me/rating_online/6
https://t.me/rating_online/3
cryptoboss casino
unlim casino
ауф казино зеркало
riobet
https://t.me/Online_1_xbet/3303
https://t.me/Online_1_xbet/2588
https://t.me/Online_1_xbet/1928
https://t.me/Online_1_xbet/2652
https://t.me/Online_1_xbet/2831
https://t.me/Online_1_xbet/2069
https://t.me/Online_1_xbet/2439
https://t.me/Online_1_xbet/1852
https://t.me/Online_1_xbet/1975
https://t.me/Online_1_xbet/1936
https://t.me/Online_1_xbet/1846
https://t.me/Online_1_xbet/3053
https://t.me/Online_1_xbet/3009
https://t.me/Online_1_xbet/1822
https://t.me/Online_1_xbet/1980
https://t.me/Online_1_xbet/1850
https://t.me/Online_1_xbet/2408
https://t.me/Online_1_xbet/2432
sykaaa официальный сайт
jvspin регистрация
https://t.me/Online_1_xbet/2583
https://t.me/Online_1_xbet/3340
https://t.me/Online_1_xbet/2915
https://t.me/Online_1_xbet/3402
https://t.me/Online_1_xbet/2294
https://t.me/Online_1_xbet/2536
https://t.me/Online_1_xbet/3095
https://t.me/Online_1_xbet/2716
https://t.me/Online_1_xbet/3475
https://t.me/Online_1_xbet/3277
https://t.me/Online_1_xbet/2274
https://t.me/Online_1_xbet/2331
https://t.me/Online_1_xbet/3576
https://t.me/Online_1_xbet/2868
https://t.me/Online_1_xbet/3515
https://t.me/Official_1xbet_1xbet/s/691
https://t.me/Official_1xbet_1xbet/s/1264
https://t.me/Official_1xbet_1xbet/s/359
https://t.me/Official_1xbet_1xbet/s/368
https://t.me/Official_1xbet_1xbet/s/1014
https://t.me/Official_1xbet_1xbet/s/1092
https://t.me/Official_1xbet_1xbet/s/1274
https://t.me/Official_1xbet_1xbet/s/596
https://t.me/Official_1xbet_1xbet/s/404
https://t.me/Official_1xbet_1xbet/s/1239
https://t.me/Official_1xbet_1xbet/s/244
https://t.me/Official_1xbet_1xbet/s/1350
cryptoboss регистрация
riobet официальный сайт
https://t.me/Official_1xbet_1xbet/s/469
https://t.me/Official_1xbet_1xbet/s/354
https://t.me/Official_1xbet_1xbet/s/635
https://t.me/Official_1xbet_1xbet/s/370
https://t.me/Official_1xbet_1xbet/s/595
https://t.me/Official_1xbet_1xbet/s/1547
https://t.me/Official_1xbet_1xbet/s/628
https://t.me/Official_1xbet_1xbet/s/852
https://t.me/Official_1xbet_1xbet/s/828
https://t.me/Official_1xbet_1xbet/s/592
https://t.me/Official_1xbet_1xbet/s/320
https://t.me/Official_1xbet_1xbet/s/1388
https://t.me/Official_1xbet_1xbet/s/65
https://t.me/Official_1xbet_1xbet/s/1034
https://t.me/Official_1xbet_1xbet/s/785
https://t.me/Official_1xbet_1xbet/s/671
https://t.me/Official_1xbet_1xbet/s/1413
https://t.me/Official_1xbet_1xbet/s/1027
https://t.me/Official_1xbet_1xbet/s/1110
https://t.me/Official_1xbet_1xbet/s/1091
https://t.me/Official_1xbet_1xbet/s/1203
https://t.me/Official_1xbet_1xbet/s/736
https://t.me/Official_1xbet_1xbet/s/342
https://t.me/Official_1xbet_1xbet/s/693
https://t.me/Official_1xbet_1xbet/s/570
https://t.me/Official_1xbet_1xbet/s/768
1xslots рабочее зеркало
дживиспин казино
https://t.me/Official_1xbet_1xbet/s/725
https://t.me/Official_1xbet_1xbet/s/435
https://t.me/Official_1xbet_1xbet/s/966
https://t.me/Official_1xbet_1xbet/s/1400
https://t.me/Official_1xbet_1xbet/s/54
https://t.me/Official_1xbet_1xbet/s/1445
https://t.me/Official_1xbet_1xbet/s/809
https://t.me/Official_1xbet_1xbet/s/1103
https://t.me/Official_1xbet_1xbet/s/1396
https://t.me/Official_1xbet_1xbet/s/272
https://t.me/Official_1xbet_1xbet/s/306
https://t.me/Official_1xbet_1xbet/s/893
https://t.me/Official_1xbet_1xbet/s/1481
https://t.me/Official_1xbet_1xbet/s/1284
https://t.me/Official_1xbet_1xbet/s/906
https://t.me/Official_1xbet_1xbet/s/1144
https://t.me/Official_1xbet_1xbet/s/243
https://t.me/Official_1xbet_1xbet/s/837
https://t.me/Official_1xbet_1xbet/s/136
https://t.me/Official_1xbet_1xbet/s/607
https://t.me/Official_1xbet_1xbet/s/1417
https://t.me/Official_1xbet_1xbet/s/767
https://t.me/Official_1xbet_1xbet/s/590
1xslots casino
sykaaa casino
https://t.me/Official_1xbet_1xbet/s/846
https://t.me/Official_1xbet_1xbet/s/1105
https://t.me/Official_1xbet_1xbet/s/151
https://t.me/Official_1xbet_1xbet/s/1253
https://t.me/Official_1xbet_1xbet/s/929
https://t.me/Official_1xbet_1xbet/s/396
https://t.me/Official_1xbet_1xbet/s/228
https://t.me/Official_1xbet_1xbet/s/965
https://t.me/Official_1xbet_1xbet/s/1416
https://t.me/Official_1xbet_1xbet/s/1296
https://t.me/Official_1xbet_1xbet/s/787
https://t.me/Official_1xbet_1xbet/s/696
https://t.me/Official_1xbet_1xbet/s/810
https://t.me/Official_1xbet_1xbet/s/637
https://t.me/Official_1xbet_1xbet/s/523
https://t.me/Official_1xbet_1xbet/s/441
https://t.me/Official_1xbet_1xbet/s/1531
https://t.me/Official_1xbet_1xbet/s/1545
https://t.me/Official_1xbet_1xbet/s/941
https://t.me/Official_1xbet_1xbet/s/723
https://t.me/Official_1xbet_1xbet/s/601
риобет регистрация
sykaaa рабочее зеркало
https://t.me/Official_1xbet_1xbet/s/385
https://t.me/Official_1xbet_1xbet/s/1102
https://t.me/Official_1xbet_1xbet/s/824
https://t.me/Official_1xbet_1xbet/s/352
https://t.me/Official_1xbet_1xbet/s/1121
https://t.me/Official_1xbet_1xbet/s/1411
https://t.me/Official_1xbet_1xbet/s/977
https://t.me/Official_1xbet_1xbet/s/1523
https://t.me/Official_1xbet_1xbet/s/185
https://t.me/Official_1xbet_1xbet/s/928
https://t.me/Official_1xbet_1xbet/s/446
https://t.me/Official_1xbet_1xbet/s/630
https://t.me/Official_1xbet_1xbet/s/205
https://t.me/Official_1xbet_1xbet/s/146
https://t.me/Official_1xbet_1xbet/s/82
https://t.me/Official_1xbet_1xbet/s/343
https://t.me/Official_1xbet_1xbet/s/363
https://t.me/Official_1xbet_1xbet/s/772
https://t.me/Official_1xbet_1xbet/s/1140
https://t.me/Official_1xbet_1xbet/s/323
анлим казино
admiral x официальный сайт
https://t.me/Official_1xbet_1xbet/s/1171
https://t.me/Official_1xbet_1xbet/s/1070
https://t.me/Official_1xbet_1xbet/s/766
https://t.me/Official_1xbet_1xbet/s/1232
В случае если вы намереваетесь совершить поездку в Париж и желаете познакомиться с городом через старинные рынки, определенно отправьтесь в самые легендарные барахолки в Париже, например блошиный рынок Монмартр или огромный блошиный рынок в Париже — Saint-Ouen. Это превосходное место для почитателей винтажа и необычных находок. Помимо этого думаю стоит исследовать карту округов Парижа по интересам и безопасности, чтобы отпраздновать с удовольствием и комфортом.
Для музейных энтузиастов настаиваю заинтересоваться на открытые бесплатно музеи в Париже, которые доступны для посещения в дебютное воскресенье месяца, а также посетить музей Массена в Ницце и музей Орсе в главном городе. Коли вы планируете поездку в Версаль, полезно предварительно понять, как проехать из Парижа в Версаль: есть удобные решения на поездах, обстоятельно можно выяснить здесь [url=https://bonjourfrancia.ru/]дворец фаро[/url] . Это даст возможность максимально эффективно структурировать ваш схему передвижения и ознакомиться с все ключевые локации.
https://t.me/Official_1xbet_1xbet/s/869
https://t.me/Official_1xbet_1xbet/s/510
https://t.me/Official_1xbet_1xbet/s/953
https://t.me/Official_1xbet_1xbet/s/125
https://t.me/Official_1xbet_1xbet/s/1002
https://t.me/Official_1xbet_1xbet/s/283
https://t.me/Official_1xbet_1xbet/s/237
https://t.me/Official_1xbet_1xbet/s/1078
https://t.me/Official_1xbet_1xbet/s/1010
https://t.me/Official_1xbet_1xbet/s/80
https://t.me/Official_1xbet_1xbet/s/429
https://t.me/Official_1xbet_1xbet/s/381
https://t.me/Official_1xbet_1xbet/s/504
https://t.me/Official_1xbet_1xbet/s/1520
https://t.me/Official_1xbet_1xbet/s/1330
https://t.me/Official_1xbet_1xbet/s/877
https://t.me/Official_1xbet_1xbet/s/1148
https://t.me/Official_1xbet_1xbet/s/783
адмирал икс регистрация
riobet регистрация
https://t.me/Official_1xbet_1xbet/s/1270
https://t.me/Official_1xbet_1xbet/s/313
https://t.me/Official_1xbet_1xbet/s/1115
https://t.me/Official_1xbet_1xbet/s/583
https://t.me/Official_1xbet_1xbet/s/1468
https://t.me/Official_1xbet_1xbet/s/1461
https://t.me/Official_1xbet_1xbet/s/120
https://t.me/Official_1xbet_1xbet/s/938
https://t.me/Official_1xbet_1xbet/s/673
https://t.me/Official_1xbet_1xbet/s/327
https://t.me/Official_1xbet_1xbet/s/679
https://t.me/Official_1xbet_1xbet/s/664
https://t.me/s/Official_1xbet_1xbet/1823
https://t.me/s/Official_1xbet_1xbet/1750
https://t.me/Official_1xbet_1xbet/1682
https://t.me/Official_1xbet_1xbet/1759
https://t.me/s/Official_1xbet_1xbet/1658
Bulk commenting service. 100,000 comments on independent websites for $100 or 1000,000 comments for $500. You can read this comment, it means my bulk sending is successful. Payment account-USDT TRC20:【TLRH8hompAphv4YJQa7Jy4xaXfbgbspEFK】。After payment, contact me via email ([email protected]),tell me your nickname, email, website URL, and comment content. Bulk sending will be completed within 24 hours. I’ll give you links for each comment.Please contact us after payment is made. We do not respond to inquiries prior to payment. Let’s work with integrity for long-term cooperation.
https://t.me/official_1win_aviator/71
https://t.me/s/official_1win_aviator/204
https://t.me/official_1win_aviator/507
https://t.me/Best_promocode_rus/888
https://t.me/s/ef_beef
Can you be more specific about the content of your article? After reading it, I still have some doubts. Hope you can help me.
https://t.me/s/Starda_officials
Thank you for your sharing. I am worried that I lack creative ideas. It is your article that makes me full of hope. Thank you. But, I have a question, can you help me? https://accounts.binance.com/es-MX/register-person?ref=GJY4VW8W
ремонт тойота [url=www.techautoport.ru/news/sezonnoe-to-toyota-kakie-raboty-obyazatelno-vypolnyat-vesnoy-i-osenyu-dlya-nadezhnosti-avtomobilya.html]www.techautoport.ru/news/sezonnoe-to-toyota-kakie-raboty-obyazatelno-vypolnyat-vesnoy-i-osenyu-dlya-nadezhnosti-avtomobilya.html[/url]